跳转至

flask

203_flask

PEP 3333

Python Web Server Gateway Interface v1.0.1:https://peps.python.org/pep-3333/

https://juejin.cn/post/6844903686905282568

WSGI

WSGI,全称 Web Server Gateway Interface,或者 Python Web Server Gateway Interface ,是基于 Python 定义的 Web 服务器和 Web 应用程序或框架之间的一种简单而通用的接口。

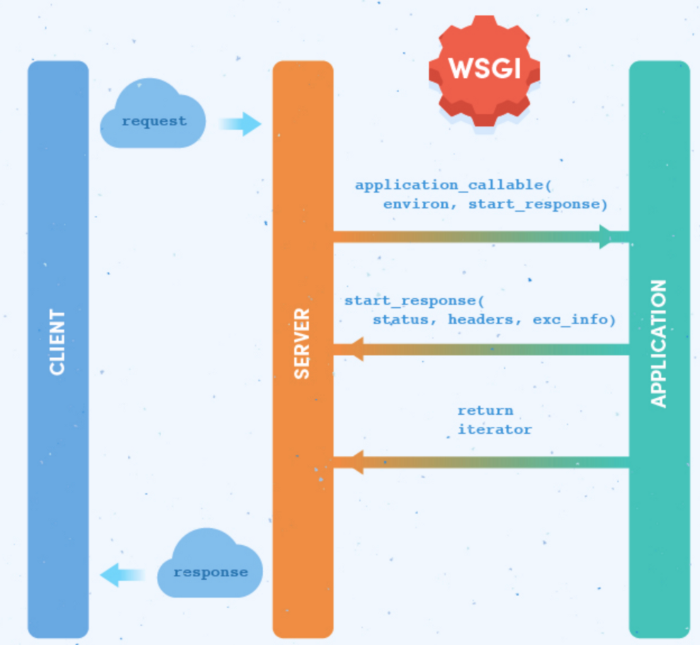
WSGI接口的作用是确保HTTP请求能够转化成python应用的一个功能调用,这也就是Gateway的意义所在,网关的作用就是在协议之前进行转换

image-20230716161138125

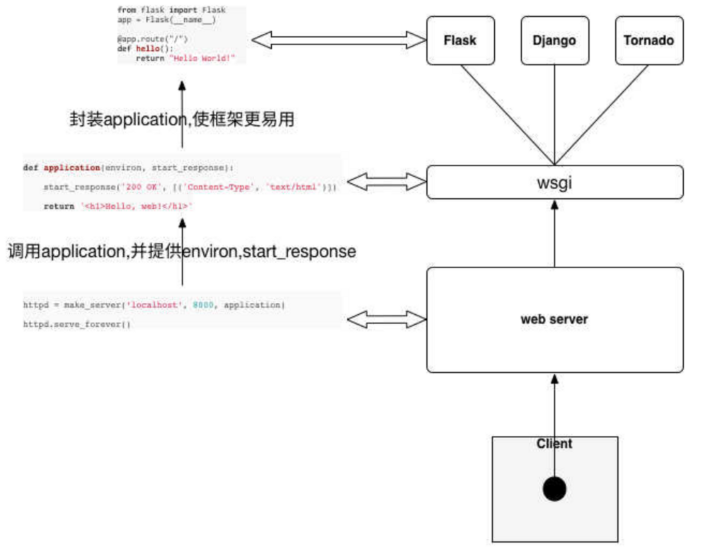
WSGI接口中有一个非常明确的标准,每个Python Web应用必须是可调用callable的对象且返回一个iterator,并实现了app(environ, start_response) 的接口,server 会调用 application,并传给它两个参数:environ 包含了请求的所有信息,start_response 是 application 处理完之后需要调用的函数,参数是状态码、响应头部还有错误信息。引用代码示例:

image-20230716161151885

WEB应用的处理请求的整体流程:

  1. 用户操作操作浏览器发送请求;
  2. 请求转发至对应的web服务
  3. web服务器*将请求转交给*web应用程序,web应用程序处理请求
  4. web应用将请求结果返回给web服务器,由web服务器返回用户响应结果
  5. 浏览器收到响应,向用户展示

可以看到,请求时Web服务器需要和web应用程序进行通信,但是web服务器有很多种啊,Python web应用开发框架也对应多种啊,所以WSGI应运而生,定义了一套通信标准。试想一下,如果不统一标准的话,就会存在Web框架和Web服务器数据无法匹配的情况,那么开发就会受到限制,这显然不合理的。

WSGI的标准或规范是?

web服务器在将请求转交给web应用程序之前,需要先将http报文转换为WSGI规定的格式。

WSGI规定,Web程序必须有一个可调用对象,且该可调用对象接收两个参数,返回一个可迭代对象:

  • environ:字典,包含请求的所有信息
  • start_response:在可调用对象中调用的函数,用来发起响应,参数包括状态码,headers等

实现一个简单WSGI服务

首先,我们编写一个符合WSGI标准的一个http处理函数:

Text Only
1
2
3
4
5
6
**def** **hello**(environ, start_response):
    status **=** "200 OK"
    response_headers **=** [('Content-Type', 'text/html')]
    start_response(status, response_headers)
    path **=** environ['PATH_INFO'][1:] **or** 'hello'
    **return** [b'<h1> %s </h1>' **%** path**.**encode()]

接下来,我们需要一个服务器启动WSGI服务器用来处理验证,使用Python内置的WSGI服务器模块wsgiref,编写server.py

Text Only
*# coding:utf-8*
"""
desc: WSGI服务器实现
"""
**from** wsgiref.simple_server **import** make_server
**from** learn_wsgi.client **import** hello

**def** **main**():
    server **=** make_server('localhost', 8001, hello)
    **print**('Serving HTTP on port 8001...')
    server**.**serve_forever()

**if** __name__ **==** '__main__':
    main()

通过实现一个简单的WSGI服务,我们可以看到:通过environ可以获取http请求的所有信息,http响应的数据都可以通过start_response加上函数的返回值作为body。

Flask与WSG

Flask中的程序实例app就是一个可调用对象,我们创建app实例时所调用的Flask类实现了call方法,call方法调用了wsgi_app()方法,该方法完成了请求和响应的处理,WSGI服务器通过调用该方法传入请求数据,获取返回数据:

Text Only
def wsgi_app(self, environ, start_response):
    ctx = self.request_context(environ)
    error = None
    try:
        try:
            ctx.push()
            response = self.full_dispatch_request()
        except Exception as e:
            error = e
            response = self.handle_exception(e)
        except:  # noqa: B001
            error = sys.exc_info()[1]
            raise
        return response(environ, start_response)
    finally:
        if self.should_ignore_error(error):
            error = None
        ctx.auto_pop(error)

def __call__(self, environ, start_response):
    return self.wsgi_app(environ, start_response)

WerkZeug

Werkzeug是一个WSGI工具包。WSGI是一个web应用和服务器通信的协议,web应用可以通过WSGI一起工作。一个基本的”Hello World”WSGI应用看起来是这样的:

Text Only
1
2
3
def application(environ, start_response):
    start_response('200 OK', [('Content-Type', 'text/plain')])
    return ['Hello World!']

上面这小段代码就是WSGI协议的约定,它有一个可调用的start_response 。environ包含了所有进来的信息。 start_response用来表明已经收到一个响应。 通过Werkzeug,我们可以不必直接处理请求或者响应这些底层的东西,它已经为我们封装好了这些。

请求数据需要environ对象,Werkzeug允许我们以一个轻松的方式访问数据。响应对象是一个WSGI应用,提供了更好的方法来创建响应。如下所示:

Text Only
1
2
3
4
5
from werkzeug.wrappers import Response

 def application(environ, start_response):
    response = Response('Hello World!', mimetype='text/plain')
    return response(environ, start_response)

路由

注册路由

flassk路由的作用是为不同的HTTP URL注册不同的视图函数,框架提供了两种注册路由的方式:

  • 方式1:通过@route装饰器,在Scaffold类中实现
  • 方式2:通过add_url_rule函数,在Scaffold中定义,Flask类继承Scaffold后对该函数重写

方式1源码如下:其本质也是通过调用方式2,只是相较而言,装饰器的方式让代码更优雅

Text Only
1
2
3
4
5
6
7
def route(self, rule: str, **options: t.Any) -> t.Callable:
    def decorator(f: t.Callable) -> t.Callable:
        endpoint = options.pop("endpoint", None)
        self.add_url_rule(rule, endpoint, f, **options)
        return f

    return decorator

方式2源码如下:

Text Only
def add_url_rule(
    self,
    rule: str,
    endpoint: t.Optional[str] = None,
    view_func: t.Optional[t.Callable] = None,
    provide_automatic_options: t.Optional[bool] = None,
    **options: t.Any,
) -> None:
    ......
    rule = self.url_rule_class(rule, methods=methods, **options)
    rule.provide_automatic_options = provide_automatic_options  # type: ignore

    self.url_map.add(rule)
    if view_func is not None:
        old_func = self.view_functions.get(endpoint)
        if old_func is not None and old_func != view_func:
            raise AssertionError(
                "View function mapping is overwriting an existing"
                f" endpoint function: {endpoint}"
            )
        self.view_functions[endpoint] = view_func
    .......

Endpoint

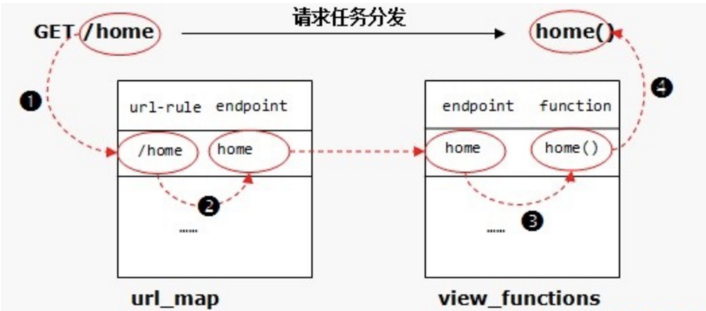
需s要注意的是, 框架中请求任务的分发并不是直接从用户请求的URL一步定位到视图函数, 两者之间还隔着一个访问点endpoint。Flask内部使用两张表维护路由:

  • url_map :维护URL规则和endpoint的映射
  • view_functions :维护endpoint和视图函数的映射

如下图,以用户访问URL/home为例,Flask将首先利用url_map找到所请求URL对应的 endpoint,即访问点home,然后再利用view_functions表查找home这个访问点对应的视图函数,最终匹配到函数home()

image-20230716161201197

关于访问点的命名规则有两种:

  • 默认访问点:当我们使用route装饰器注册路由时,默认使用被装饰函数的函数名作为访问点;
  • 自定义访问点:可以在使用route装饰器或调用add_url_rule()方法注册路由时,使用endpoint关键字参数改变这一默认行为;
Python
1
2
3
@app.route('/home', endpoint = 'whocare')
def home():
    pass

通过endpoint关键字自定义路由对应的访问点,路由表对应规则即如下图:

image-20230716161208069

为什么需要endpoint做中间层?

Text Only
1
2
3
4
5
6
7
8
9
endpoint`通常用来“反向查找”。例如,你想从一个页面跳转到另一个页面时,你可以使用`url_for(endpoint,**values)
@app.route('/')
def index():
    # This will print '/greeting/Mark'
    print url_for('give_greeting', name='Mark')

@app.route('/greeting/<name>')
def give_greeting(name):
    return 'Hello, {0}!'.format(name)

因此,endpoint这种中间层的存在可以方便代码解耦,单独修改url不会影响现有的跳转实现。

endpoint源码如下,定义在Scaffold类中

Text Only
1
2
3
4
def endpoint(self, endpoint: str) -> t.Callable:
    def decorator(f):
        self.view_functions[endpoint] = f
        return f

静态目录路由

关s于静态目录路由的配置方式也有两种:

  • 默认静态目录路由
  • 自定义静态目录路由

默认静态目录路由:当创建应用实例时,Flask将自动添加一条静态目录路由,其访问点始终被设置为static,URL规则默认被设置为/static,本地路径默认被设置为应用文件夹下的static子文件夹。例如如下目录,那么启动应用后就可以通过URL/static/main.css访问static文件夹下的main.css了。

Text Only
1
2
3
4
5
/app
    /web.py
    /static
        /main.css
        /jquery.min.js

自定义静态目录路由 :可以在创建应用对象时使用关键字参数static_folder改变 默认的静态文件夹。例如,你的静态文件都存放在应用下的assets目录下, 那么可以按如下的方式创建应用对象:

Text Only
1
2
3
// 改变默认的本地路径并不会对路由表产生影响。
app = Flask(name,static_folder='assets') // 相对路径
app = Flask(name,static_folder='/var/www/static') // 绝对路径

改变默认的URL规则 : 如果不喜欢静态目录URL/static,也可以在创建应用 对象时使用关键字参数static_url_path换一个别的名字。下面的示例中,将应用下的assets文件夹注册为静态目录/assets:

Text Only
// 当应用运行后,通过URL/assets/main.css就可以访问assets文件夹下的 main.css文件了
app = Flask(name,static_folder='assets',static_url_path='/assets')

启动过程

以如下flask程序介绍框中整体流程。

Text Only
from flask import Flask

# 第一步:创建Flask类实例,类变量赋值以及构造函数初始化
app = Flask(__name__)

# 第二步:路由注册
# 装饰器在执行main函数之前就已经运行了,但是被装饰的函数只有在调用时才能运行。
@app.route("/")
def hello():
    return "hello"

# 第三步:运行flask主程序
if __name__ == '__main__':
    app.run()

时序图

image-20230716161225771

服务器

werkzeug中BaseWSGIServer类继承自Python自带http模块实现服务端:

Text Only
def serve_forever(self, poll_interval=0.5):
    """Handle one request at a time until shutdown.

    Polls for shutdown every poll_interval seconds. Ignores
    self.timeout. If you need to do periodic tasks, do them in
    another thread.
    """
    self.__is_shut_down.clear()
    try:
        # XXX: Consider using another file descriptor or connecting to the
        # socket to wake this up instead of polling. Polling reduces our
        # responsiveness to a shutdown request and wastes cpu at all other
        # times.
        with _ServerSelector() as selector:
            selector.register(self, selectors.EVENT_READ)

            while not self.__shutdown_request:
                ready = selector.select(poll_interval)
                # bpo-35017: shutdown() called during select(), exit immediately.
                if self.__shutdown_request:
                    break
                if ready:
                    self._handle_request_noblock()

                self.service_actions()
    finally:
        self.__shutdown_request = False
        self.__is_shut_down.set()

参考资料


最后更新: 2024-04-14